Building a RAG Pipeline

Introduction
In simple terms, the basic RAG process consists of the following three steps.
- Document structuring and parsing
- Chunking / Embedding
- Fact-Based Retrieval / Answer Generation
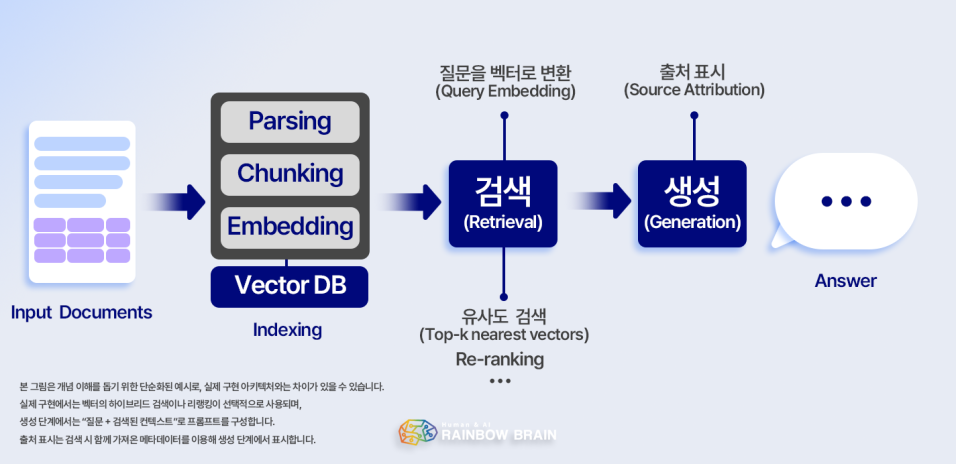
For document-based RAG, the process ends with quoting a paragraph in step 3.
Since we’re dealing with broadcast video, the answer is not a paragraph but a video clip segment (v_id + start~end).
Therefore, we divided Parsing, Chunking, and Retrieval into separate agent units.
RAG Pipeline = agent-scenario (indexing) + agent-search (search·generation)
Building the Scenemaker Agent
💡 The entire Scenemaker Multi-Agent system was configured as follows.
1. Parsing — Uses video as analysis data
-
Subtitles — agent-stt
- STT → Dialogue
- (Whisper, upcoming Qwen3-ASR) Model configuration in progress
- STT → Dialogue
-
Screen — agent-vision
-
VLM → Screen, OCR, Motion
-
Audio → Sound · BGM
-
2. Chunking + Embedding — agent-scenario
- Segments are grouped into semantic layers and indexed as vectors.
-
4-tier segmentation: Segment → Scene → Sub-scene → Overall Plot (map-reduce)
-
Indexed into a single Milvus collection after embedding
-
3. Retrieval and Generation (Retrieval + Generation) — agent-search
- Receives a query and finds clip segments using LangGraph’s 6-step process.
- Output is a list of clip segments (v_id + start–end)
Table Implementation
| Process | Responsible | Task |
|---|---|---|
| Upload | ui-workspace (Next.js) | Upload to S3 + Console for viewing analysis results |
| ① Subtitles | agent-stt | Audio → Dialogue·Speaker, vLLM subtitle correction |
| ② Video Analysis | agent-vision | Analysis of 6-second segments: video, OCR, audio, and motion |
| ③ Indexing | agent-scenario | Scene → Act → Overall Map-Reduce summary + Character identification + Embedding |
| ④ Search | agent-search | Query via LangGraph’s 6-step process (scope → plan → retrieve → expand → select → assemble) → Clip |
First, let’s look at the flow of “agent-scenario” and “agent-search,”
and we’ll cover the detailed implementation and tuning in the next post.
Agent-Scenario
💡 Flow for indexing video analysis results as plot, characters, and vectors
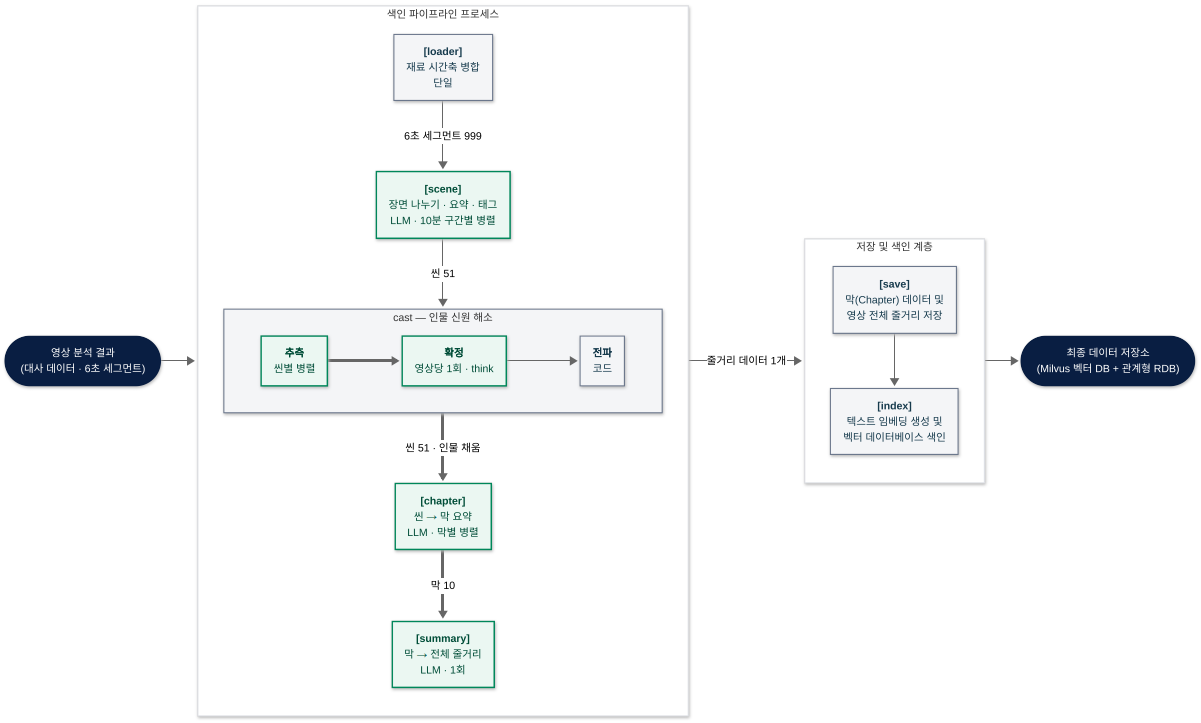
Agent-Scenario Summary Table
| # | Step | In simple terms | What it actually does | Qwen3.6 |
|---|---|---|---|---|
| 0 | loader | Unpacking data | Merge video dialogue (t_dialogue) and screen segments (t_segment) in chronological order | ❌ |
| 1 | scene | Split into scenes | Scene boundaries + summaries + tags (highlights, emotions, ads) | ✅ Every 10 minutes |
| 2 | cast | Identify characters | Guess → Confirm → Propagate (only confirm when "think" is on) | ✅ Per scene + 1 time |
| 3 | chapter | Group into acts | Group scenes into 10-minute "acts" and summarize (reduce) | ✅ Per act |
| 4 | summary | Write overall plot | Combine acts into a single plot summary for the video (reduce) | ✅ Once |
| 5 | save | Save notes | Record in DB | ❌ |
| 6 | index | Index for search | Embedding → 1 Milvus collection | ❌ |
In a nutshell, it’s all about 6-second atoms → folding into units of meaning → converting to vectors.
The reason for folding a long video using map-reduce rather than summarizing it all at once—and the reason for logging timecodes at each step—is the same: the ultimate goal is clip creation.
The “Guess → Confirm → Propagate” process in cast follows the same logic. Since a single scene isn’t enough to identify a person, we first confirm the identity across the entire video and then apply it back to each individual scene.
Agent-Search
💡 A graph illustrating the video search process
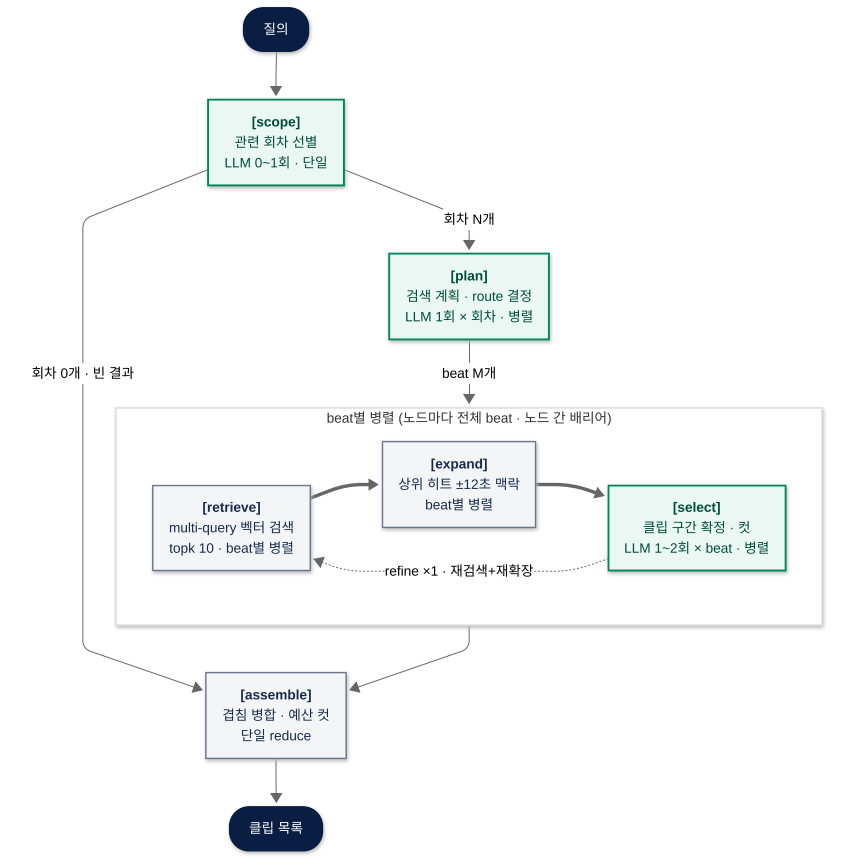
Summary Table by Agent-Search Node
| # | Node | In simple terms | What it actually does | Qwen3.6 |
|---|---|---|---|---|
| 1 | scope | Which video is it? | Selects only relevant episodes (40-vote chapter vector → LLM confirmation, up to 5) | ✅ 0–1 times |
| 2 | plan | Compile a list of what to find | List of scenes (beats) to find + 2–3 search terms per scene + determine route | ✅ Once per episode |
| 3 | retrieve | Retrieve similar clips | Vector search using keywords → Remove duplicates → Top 10 candidates | ❌ |
| 4 | expand | View the context before and after | Attach a ±12-second context window to the top hits | ❌ |
| 5 | select | Is this really the right one? Where should I cut it? | Finalize clip range [start–end] or discard (once per material) | ✅ 1–2 times per beat |
| 6 | assemble | Combine and adjust length | Merge overlaps → Trim to target length → Sort → Final list | ❌ |
The biggest difference from the RAG paper is what happens after retrieve.
Since a 6-second hit isn’t a clip, we concatenate the beginning and end with expand, then select determines the section to clip.
If it doesn’t match, it’s discarded rather than forced to fill the gap (once per beat for the material).
The LLM is used only for scope, plan, and select; retrieve, expand, and assemble are implemented in code.
I’ll cover how the nodes were assembled (inputs, outputs, etc.) in a future post.
Conclusion
Currently, only the pipeline construction has been completed; actual model training and code implementation are still in progress.
In a future post, I will describe the design of a broadcasting workflow based on this pipeline.
This article presents research results supported by the Ministry of Science and ICT and the National IT Industry Promotion Agency through the “2026 Open-Source AI and Software Development and Utilization Support Project.”